Learning Objectives
After completing this lesson, you'll be able to:
- Use parallel processing in automations.
- Understand when to use the Split-Merge Block.
- Create an automation with the Split-Merge Block.
In this lesson, you will:
- Optional: Watch a demonstration video (if you have not attended the live training).
- Scroll down to read the activity instructions below and follow the steps in your lab.
- Complete the quiz at the end of this lesson.
- Click 'Next' to mark the lesson complete.
Learning Objectives
After completing this lesson, you'll be able to:
- Use parallel processing in automations.
- Understand when to use the Split-Merge Block.
- Create an automation with the Split-Merge Block.
In this lesson, you will:
- Optional: Watch a demonstration video (if you have not attended the live training).
- Scroll down to read the activity instructions below and follow the steps in your lab.
- Complete the quiz at the end of this lesson.
- Click 'Next' to mark the lesson complete.
Resources
- Starting project | C:\FMEData\Resources\FlowAuthoring\fme-flow-authoring--starting-project.fsproject
- Encryption key | C:\FMEData\Resources\FlowAuthoring\fme-flow-authoring--key.jceks
If you're taking a live Safe Software-hosted training course or using an on-demand lab for this course, we've already imported the content for this lesson into your FME Flow.
If you're completing this lesson with your own FME Flow, you must import the starting project with the content into your FME Flow.
See FME Flow Authoring: Instructions to Import the Starting Project for directions to import the project to your own FME Flow.
Split-Merge Block
In FME Flow Automations, you may split your workflows to process multiple actions simultaneously and use FME Flow's parallel processing capabilities with numerous engines. Splitting your workflow lowers the processing time by running multiple workspaces at once. It also increases fault tolerance, as workspaces that run in parallel will still process even if one workspace fails.
When you split your workflows, each stream creates an output. To combine the outputs into a single message in Automations, you use a Split-Merge Block. The Split-Merge Block lets you split the Automation workflow into multiple streams and then wait for all components within the block to complete before continuing the workflow along a single stream.
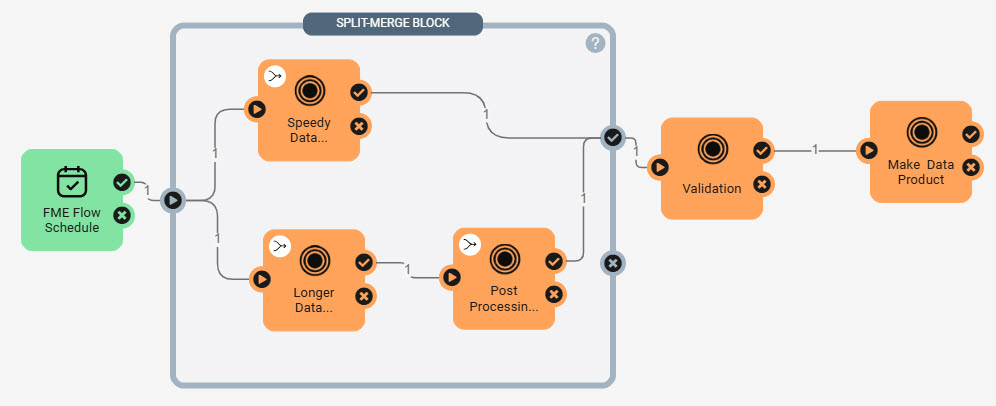
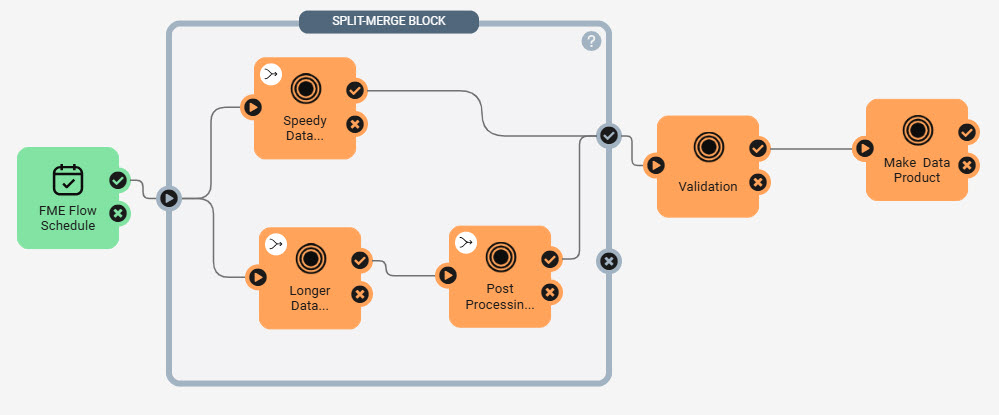
In this workflow, the trigger passes one message to the Split-Merge Block. The workflow is split and sends two messages, one to each workspace. Once the workspaces are complete, each workspace sends a message to the block's success port. The Split-Merge Block combines the two messages into one message and passes it along to the Validation workspace action. Two messages would pass to the Validation workspace without the Split-Merge Block, triggering it to run twice.

The Merge Messages action in FME Flow Automations functions similarily to the Split-Merge Block by merging messages and waiting to process all downstream actions until it receives messages from all previous actions. Compared to the Split-Merge Block, the Merge Messages action limits you from merging messages from multiple triggers and from Automation Writer outputs. Due to these, the Merge Messages action is legacy functionality in Automations and is only present to support backwards compatibility for your workflows. For more information, see our Merge Messages documentation.
Automations Writer and Split-Merge Block
You may also use the Split-Merge Block to combine outputs from Automations Writers in workspace actions. Oftentimes, a single workspace run with an Automations Writer outputs multiple messages through the Automations Writer port, which triggers downstream actions to run multiple times for one initial input message from a trigger. You often only need to send one outgoing message with an external action or process a downstream summary workspace once. In this case, the Split-Merge Block will combine output messages from Automations Writers within it and merge them into one message to output.

In this example, the Process State workspace action outputs 60 messages through the County Automations Writer port, which enter the Split-Merge Block and trigger the Process County workspace to run 60 times. Each county contains 15 blocks, so the Block Automations Writer outputs 900 messages and triggers the Process Block workspace to run 900 times. The Split-Merge Block waits for all 900 messages from the Process Block workspace, merges them by county, and outputs only 60 messages to the Downstream Work action that processes one job per county.
Considerations with the Split-Merge Block
While the Split-Merge Block is handy for your parallel processing or Automations Writer workflows, there are some limitations you should be aware of when you use it:
- The Split-Merge Block only supports Run a Workspace and Run a Dynamic Workspace actions.
- The Split-Merge Block only outputs from a single port, either the success or failure port, not both. If the workspaces send messages to both ports, the failure port takes precedence, and messages are only output from it.
- If no messages pass to either output port, the Split-Merge Block will output a single message from the success port to indicate that all jobs within the block are complete.
- You cannot directly connect an action upstream in the Automation to an action within the Split-Merge Block; it must connect through the block's input port. You can, however, directly connect an output port from an action within the block to an outside action downstream of the block.
Exercise

Frank is designing an automation to perform asynchronous data updates daily. He has multiple workspaces for data updates and post-processing, performs data validation, and makes a final product once the updates are complete. Frank already has the workspaces on FME Flow, and the next step is to create the automation.
In this lesson, you will:
- Create an automation that uses parallel processing for workspaces.
- Use the Split-Merge Block to merge messages from parallel processes.
1) Create Automation
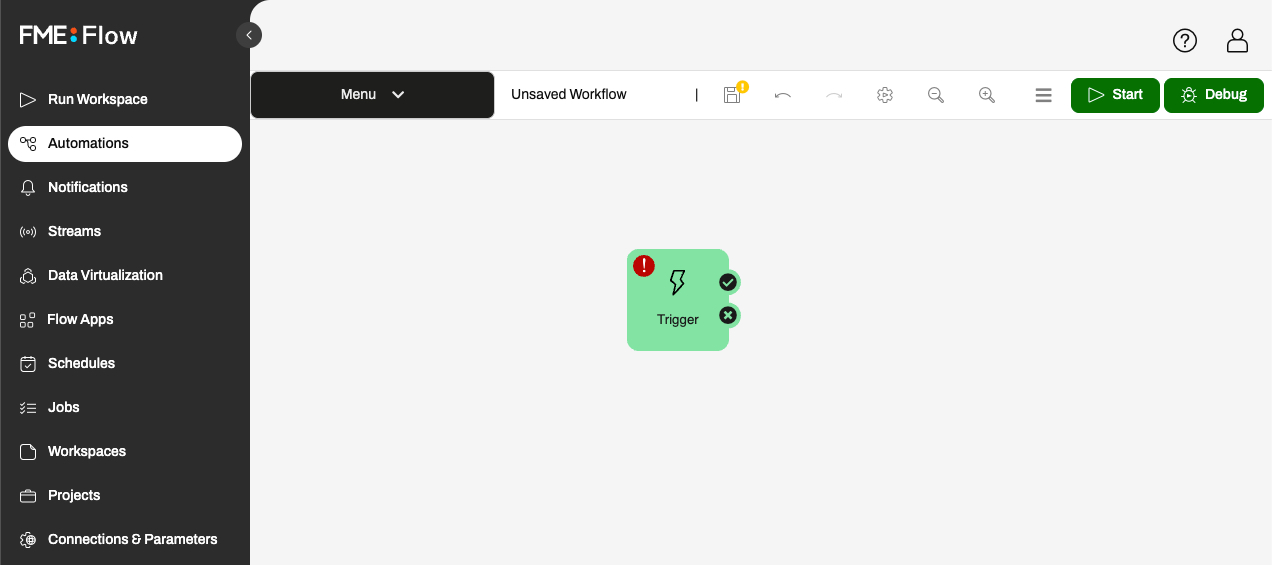
- On FME Flow, create a new automation.
2) Configure a Schedule Trigger
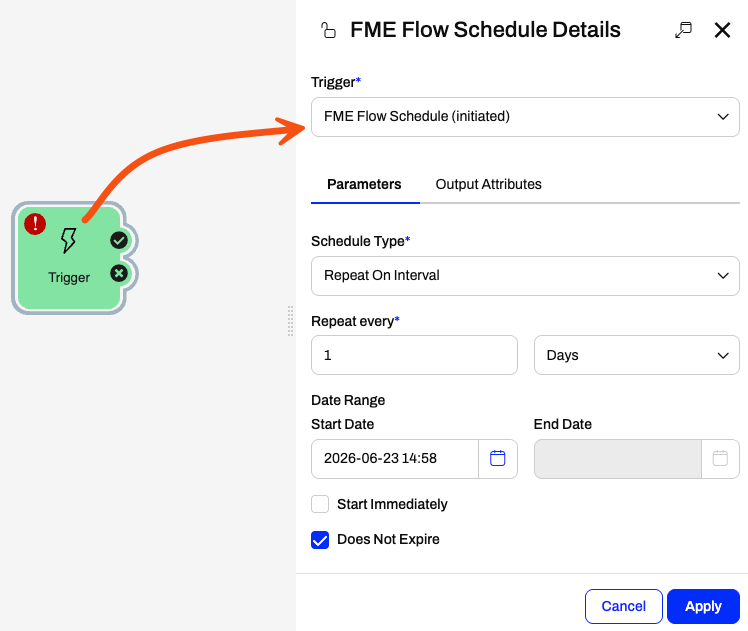
- Click the trigger icon to open its details.
- Configure the trigger to be an FME Flow Schedule trigger to run on a daily interval.
- Select Repeat on Interval for the Schedule Type and set the interval to 1 day.
- Ensure Does Not Expire is selected.
- Click Apply to close the trigger details.
3) Add Data Updates Workspaces
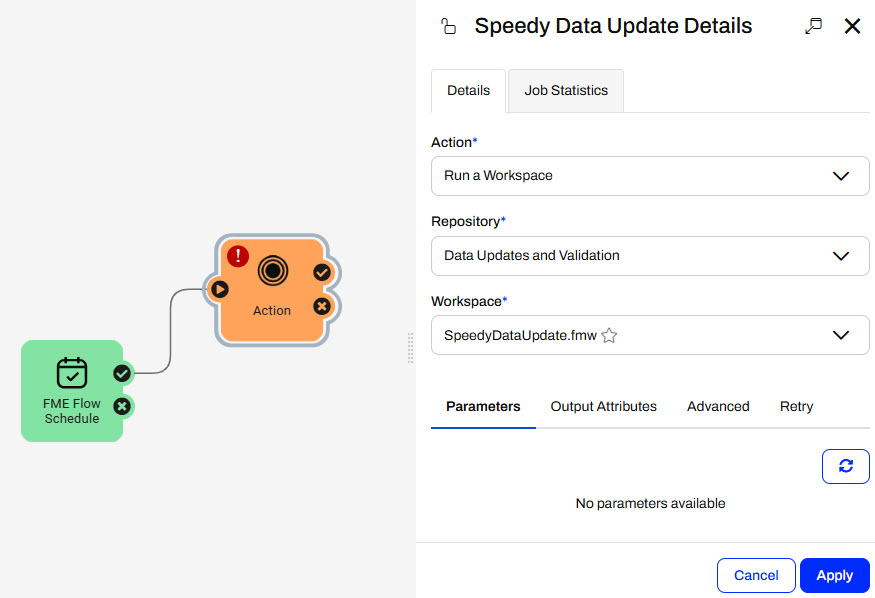
- Add a Run a Workspace internal action to the trigger success port.
- Select the SpeedyDataUpdate.fmw workspace in the Data Updates and Validation repository.
- Since the workspace has no configurable parameters, click Apply.
The example workspaces for this exercise are placeholders – they don't really carry out any data integration. However, the Automation design follows common real-world scenario by performing data updates and validation checks.
Frank has another data update that takes longer and can run asynchronously to the SpeedyDataUpdate workspace.
- Add another Run a Workspace action and connect it to the trigger's success port.
- Set the workspace to run the LongerDataUpdate.fmw workspace in the Data Updates and Validation repository.
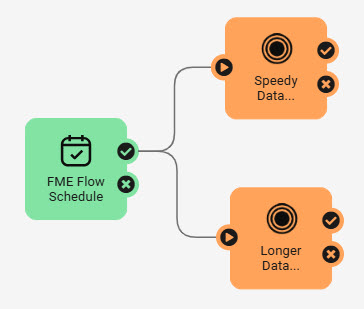
By splitting the workflow, the SpeedyDataUpdate and LongerDataUpdate workspaces will run simultaneously on different FME Engines, as long as multiple engines are available.
After the LongerDataUpdate workspace is complete, the data must undergo post-translation processing.
- Add another Run a Workspace action and set it to run the PostProcessing_LDU.fmw workspace in the same repository.
- Connect it to the success port of the LongerDataUpdate workspace action.
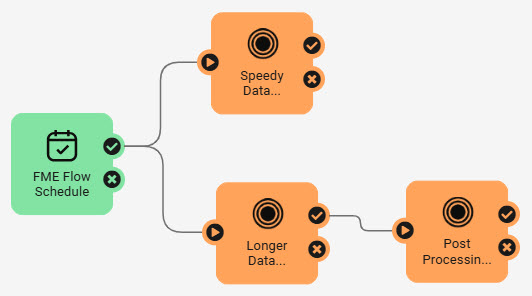
After both data update processes, Frank needs to run his Validation and MakeDataProduct workspaces in order.
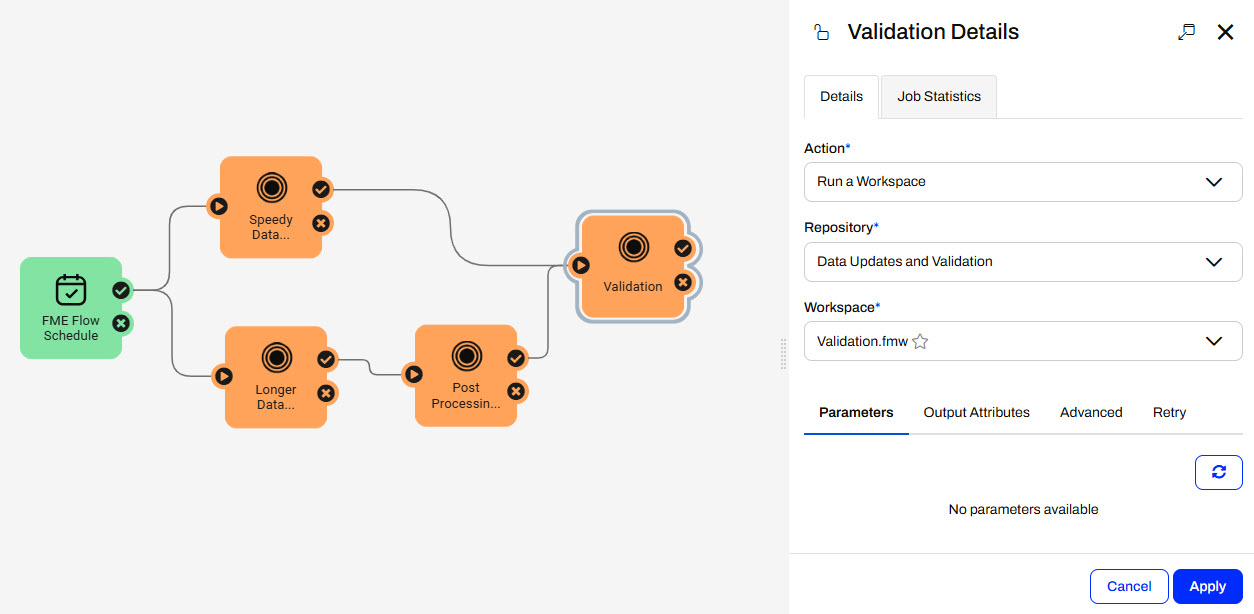
- Add the Validation.fmw from the Data Updates and Validation repository and connect it to the success ports of the SpeedyDataUpdate and the PostProcessing_LDU actions.
- After the Validation workspace, add the MakeDataProduct.fmw, which is also in the Data Updates and Validation repository.
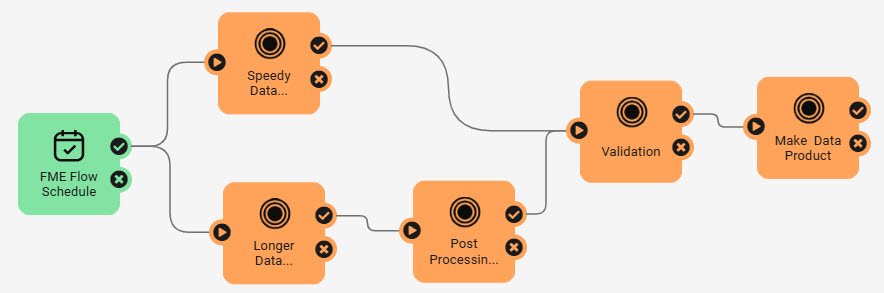
If you start and trigger the automation, the trigger will send a message to both the Speedy and Longer Data Update workspaces and trigger them to run simultaneously. Once the Speedy Data Update finishes, it sends a message to run the Validation and Make Data Product workspaces. After the Longer Data Update is complete, the Post Processing workspace runs and sends a message to run the Validation and Make Data Product workspaces. The automation runs the Validation and Make Data Product workspaces twice: it splits the data stream into two, then combines them in the Validation workspace. 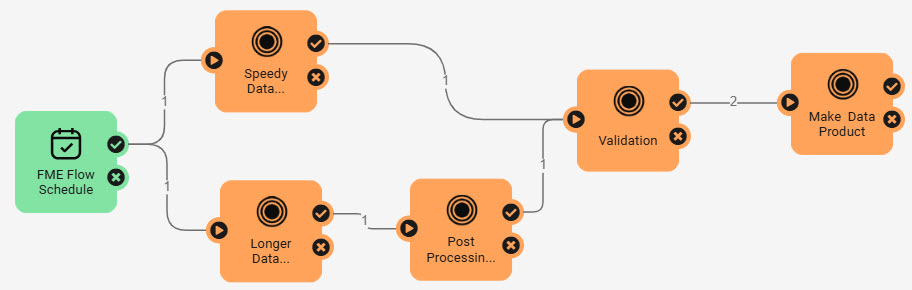
5) Add Split-Merge Block
Frank needs to run the Validation and Make Data Product workspaces only once per automation trigger, not twice. Therefore, you'll need to use the Split-Merge Block to split the workflow and merge the messages from the Data Updates before continuing with the Validation workspace.
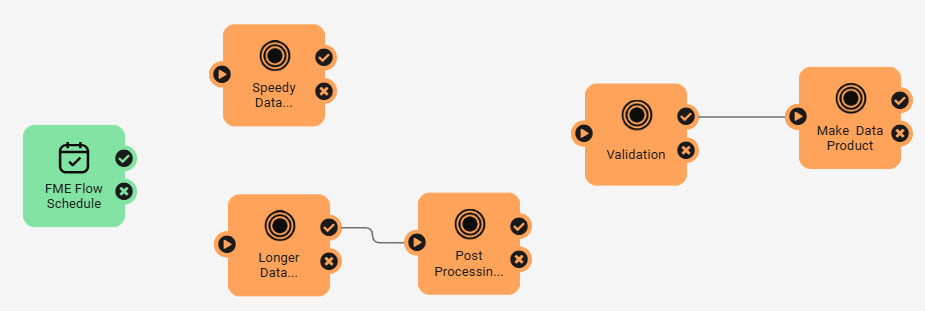
- Disconnect the trigger from the first two workspaces and disconnect the Validation workspace from the Speedy Data Update and Post Processing workspaces.
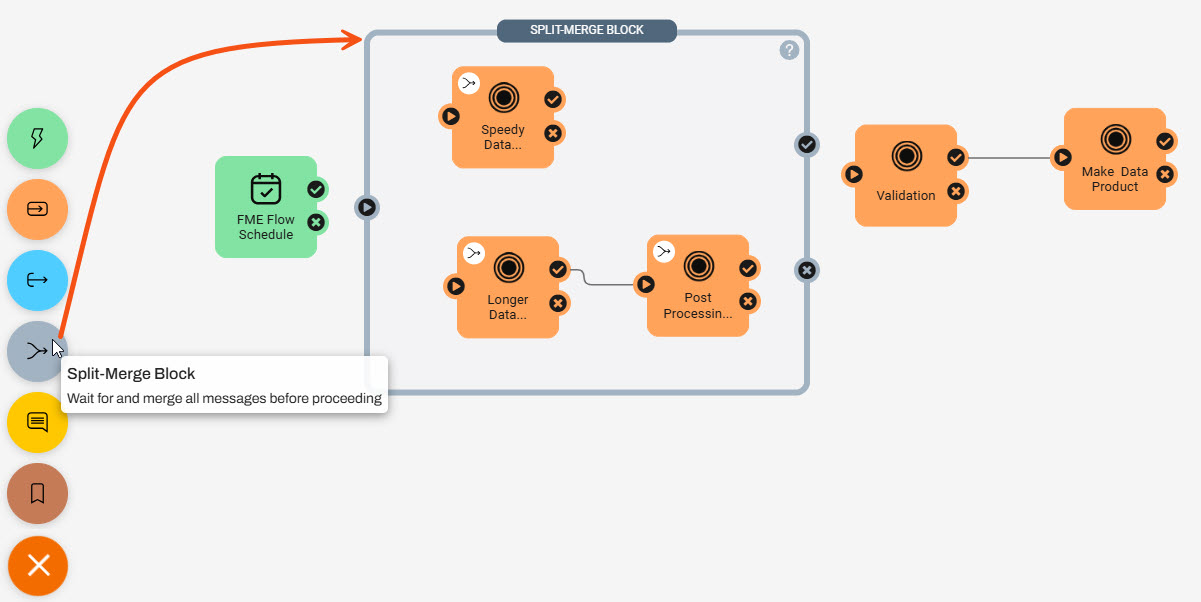
- Add a Split-Merge Block to the canvas and place it around the Data Updates and Post Processing workspace actions.
- Connect the workspaces to the block's input and success output ports, the trigger to the input port, and the Validation action to the output success port.
6) Start and Trigger the Automation
- Save the automation as Daily Data Update and click Start.
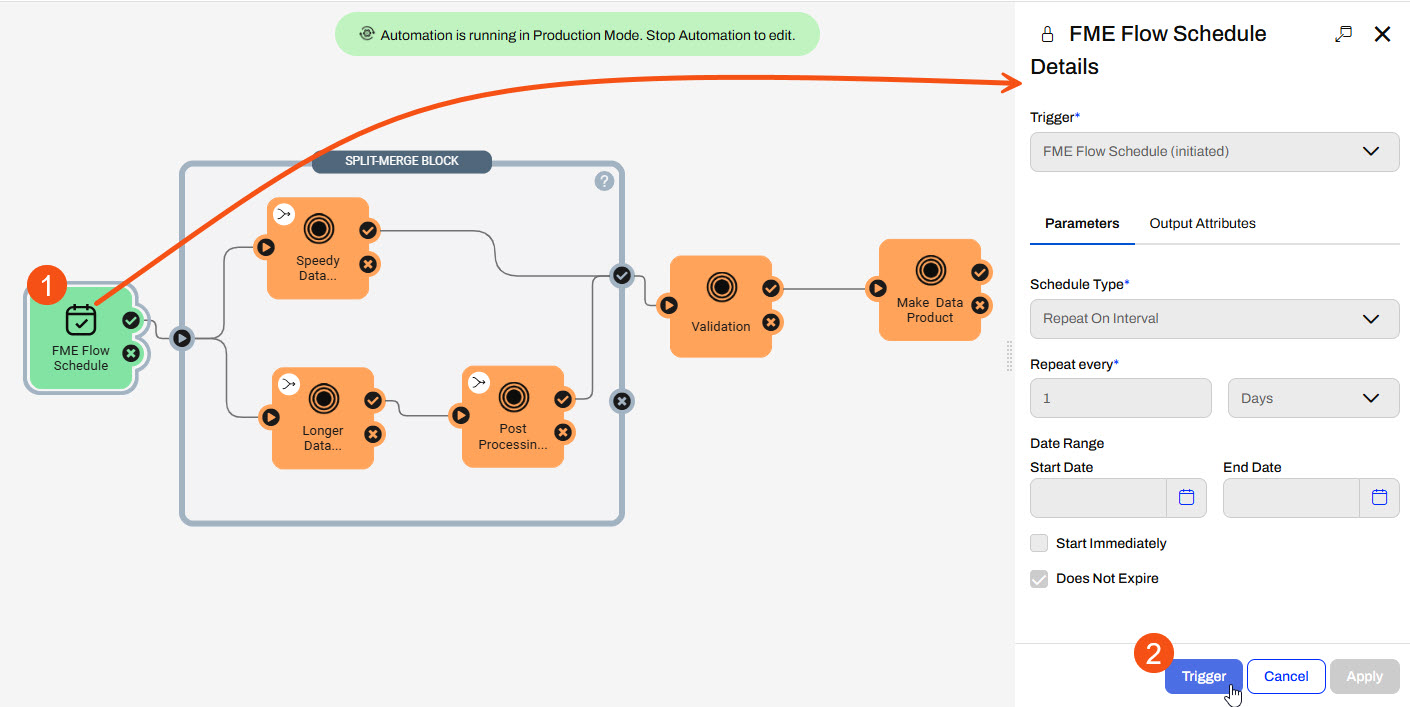
- To run the Automation before tomorrow, click the FME Flow Schedule trigger icon, then click Trigger in its details pane.
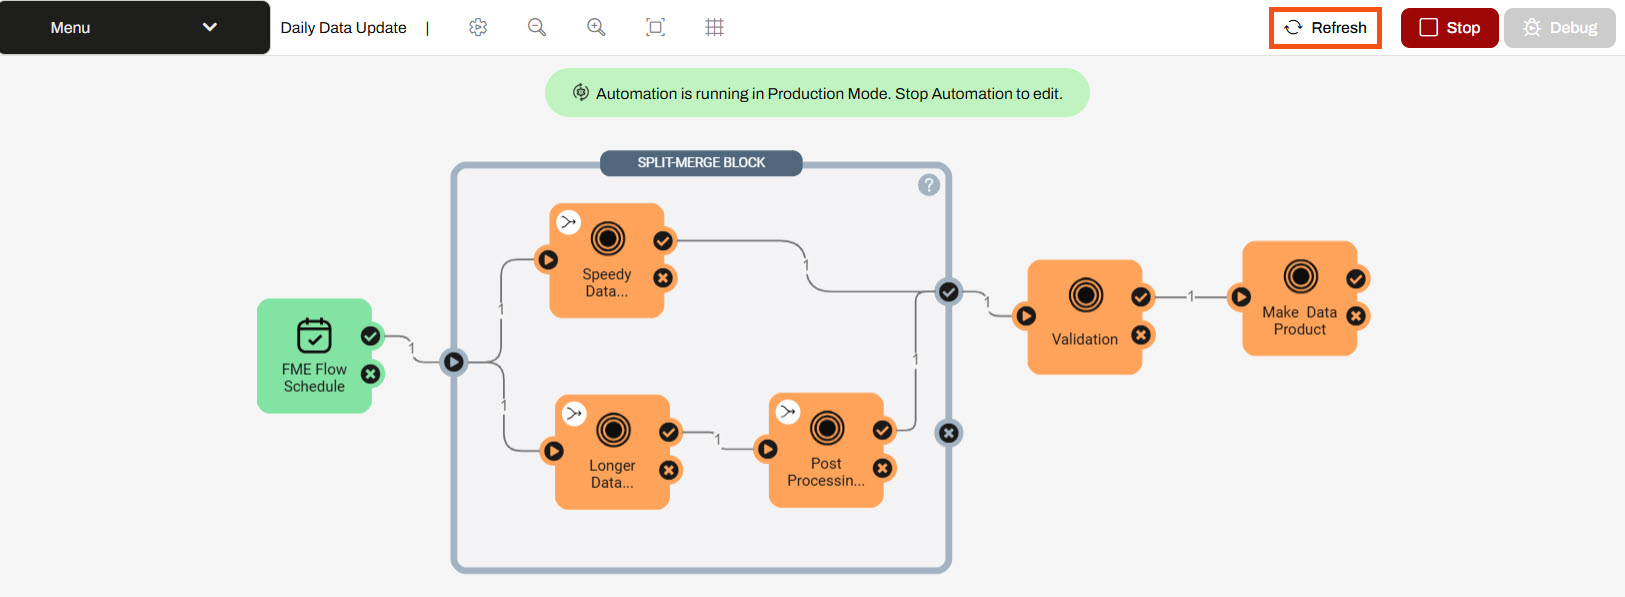
- Refresh the automation canvas after a couple of moments.
- You'll see the event counts show that the Validation and Make Data Product workspaces ran only once, meaning the Split-Merge Block merged the output messages from the parallel processes before continuing with the downstream actions.
7) Inspect Jobs
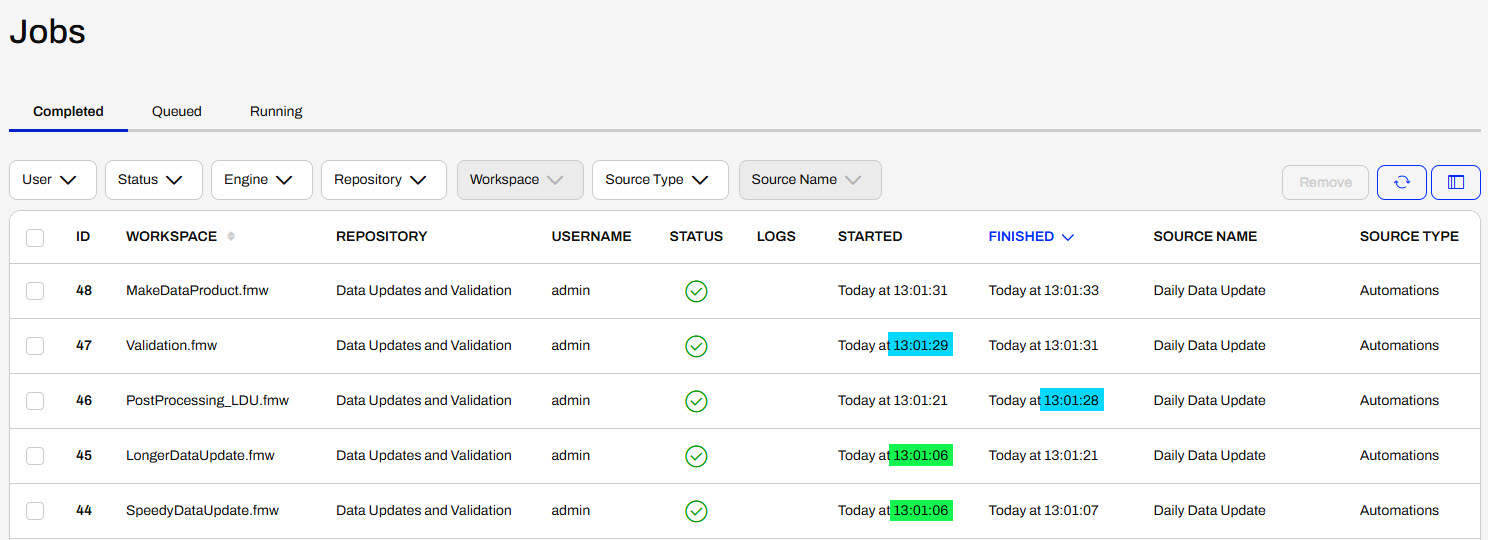
- Navigate to the Jobs page on FME Flow and inspect the jobs that ran from the Daily Data Update automation.
- You'll see that the Speedy and Longer Data Updates started at the same time and ran simultaneously, yet the Validation workspace did not run until the PostProcessing_LDU workspace completed.
You've used the Split-Merge Block to orchestrate parallel processing and merge the workflow back into a single stream before continuing with downstream workspace actions. This automation accomplishes Frank's task for data updates while leveraging FME Flow's parallel processing and the Split-Merge Block.
Resources
- Starting project | C:\FMEData\Resources\FlowAuthoring\fme-flow-authoring--starting-project.fsproject
- Encryption key | C:\FMEData\Resources\FlowAuthoring\fme-flow-authoring--key.jceks
If you're taking a live Safe Software-hosted training course or using an on-demand lab for this course, we've already imported the content for this lesson into your FME Flow.
If you're completing this lesson with your own FME Flow, you must import the starting project with the content into your FME Flow.
See FME Flow Authoring: Instructions to Import the Starting Project for directions to import the project to your own FME Flow.
Split-Merge Block
In FME Flow Automations, you may split your workflows to process multiple actions simultaneously and use FME Flow's parallel processing capabilities with numerous engines. Splitting your workflow lowers the processing time by running multiple workspaces at once. It also increases fault tolerance, as workspaces that run in parallel will still process even if one workspace fails.
When you split your workflows, each stream creates an output. To combine the outputs into a single message in Automations, you use a Split-Merge Block. The Split-Merge Block lets you split the Automation workflow into multiple streams and then wait for all components within the block to complete before continuing the workflow along a single stream.
In this workflow, the trigger passes one message to the Split-Merge Block. The workflow is split and sends two messages, one to each workspace. Once the workspaces are complete, each workspace sends a message to the block's success port. The Split-Merge Block combines the two messages into one message and passes it along to the Validation workspace action. Two messages would pass to the Validation workspace without the Split-Merge Block, triggering it to run twice.
The Merge Messages action in FME Flow Automations functions similarily to the Split-Merge Block by merging messages and waiting to process all downstream actions until it receives messages from all previous actions. Compared to the Split-Merge Block, the Merge Messages action limits you from merging messages from multiple triggers and from Automation Writer outputs. Due to these, the Merge Messages action is legacy functionality in Automations and is only present to support backwards compatibility for your workflows. For more information, see our Merge Messages documentation.
Automations Writer and Split-Merge Block
You may also use the Split-Merge Block to combine outputs from Automations Writers in workspace actions. Oftentimes, a single workspace run with an Automations Writer outputs multiple messages through the Automations Writer port, which triggers downstream actions to run multiple times for one initial input message from a trigger. You often only need to send one outgoing message with an external action or process a downstream summary workspace once. In this case, the Split-Merge Block will combine output messages from Automations Writers within it and merge them into one message to output.
In this example, the Process State workspace action outputs 60 messages through the County Automations Writer port, which enter the Split-Merge Block and trigger the Process County workspace to run 60 times. Each county contains 15 blocks, so the Block Automations Writer outputs 900 messages and triggers the Process Block workspace to run 900 times. The Split-Merge Block waits for all 900 messages from the Process Block workspace, merges them by county, and outputs only 60 messages to the Downstream Work action that processes one job per county.
Considerations with the Split-Merge Block
While the Split-Merge Block is handy for your parallel processing or Automations Writer workflows, there are some limitations you should be aware of when you use it:
- The Split-Merge Block only supports Run a Workspace and Run a Dynamic Workspace actions.
- The Split-Merge Block only outputs from a single port, either the success or failure port, not both. If the workspaces send messages to both ports, the failure port takes precedence, and messages are only output from it.
- If no messages pass to either output port, the Split-Merge Block will output a single message from the success port to indicate that all jobs within the block are complete.
- You cannot directly connect an action upstream in the Automation to an action within the Split-Merge Block; it must connect through the block's input port. You can, however, directly connect an output port from an action within the block to an outside action downstream of the block.
Exercise
Frank is designing an automation to perform asynchronous data updates daily. He has multiple workspaces for data updates and post-processing, performs data validation, and makes a final product once the updates are complete. Frank already has the workspaces on FME Flow, and the next step is to create the automation.
In this lesson, you will:
- Create an automation that uses parallel processing for workspaces.
- Use the Split-Merge Block to merge messages from parallel processes.
1) Create Automation
- On FME Flow, create a new automation.
2) Configure a Schedule Trigger
- Click the trigger icon to open its details.
- Configure the trigger to be an FME Flow Schedule trigger to run on a daily interval.
- Select Repeat on Interval for the Schedule Type and set the interval to 1 day.
- Ensure Does Not Expire is selected.
- Click Apply to close the trigger details.
3) Add Data Updates Workspaces
- Add a Run a Workspace internal action to the trigger success port.
- Select the SpeedyDataUpdate.fmw workspace in the Data Updates and Validation repository.
- Since the workspace has no configurable parameters, click Apply.
The example workspaces for this exercise are placeholders – they don't really carry out any data integration. However, the Automation design follows common real-world scenario by performing data updates and validation checks.
Frank has another data update that takes longer and can run asynchronously to the SpeedyDataUpdate workspace.
- Add another Run a Workspace action and connect it to the trigger's success port.
- Set the workspace to run the LongerDataUpdate.fmw workspace in the Data Updates and Validation repository.
By splitting the workflow, the SpeedyDataUpdate and LongerDataUpdate workspaces will run simultaneously on different FME Engines, as long as multiple engines are available.
After the LongerDataUpdate workspace is complete, the data must undergo post-translation processing.
- Add another Run a Workspace action and set it to run the PostProcessing_LDU.fmw workspace in the same repository.
- Connect it to the success port of the LongerDataUpdate workspace action.
After both data update processes, Frank needs to run his Validation and MakeDataProduct workspaces in order.
- Add the Validation.fmw from the Data Updates and Validation repository and connect it to the success ports of the SpeedyDataUpdate and the PostProcessing_LDU actions.
- After the Validation workspace, add the MakeDataProduct.fmw, which is also in the Data Updates and Validation repository.
If you start and trigger the automation, the trigger will send a message to both the Speedy and Longer Data Update workspaces and trigger them to run simultaneously. Once the Speedy Data Update finishes, it sends a message to run the Validation and Make Data Product workspaces. After the Longer Data Update is complete, the Post Processing workspace runs and sends a message to run the Validation and Make Data Product workspaces. The automation runs the Validation and Make Data Product workspaces twice: it splits the data stream into two, then combines them in the Validation workspace.
5) Add Split-Merge Block
Frank needs to run the Validation and Make Data Product workspaces only once per automation trigger, not twice. Therefore, you'll need to use the Split-Merge Block to split the workflow and merge the messages from the Data Updates before continuing with the Validation workspace.
- Disconnect the trigger from the first two workspaces and disconnect the Validation workspace from the Speedy Data Update and Post Processing workspaces.
- Add a Split-Merge Block to the canvas and place it around the Data Updates and Post Processing workspace actions.
- Connect the workspaces to the block's input and success output ports, the trigger to the input port, and the Validation action to the output success port.
6) Start and Trigger the Automation
- Save the automation as Daily Data Update and click Start.
- To run the Automation before tomorrow, click the FME Flow Schedule trigger icon, then click Trigger in its details pane.
- Refresh the automation canvas after a couple of moments.
- You'll see the event counts show that the Validation and Make Data Product workspaces ran only once, meaning the Split-Merge Block merged the output messages from the parallel processes before continuing with the downstream actions.
7) Inspect Jobs
- Navigate to the Jobs page on FME Flow and inspect the jobs that ran from the Daily Data Update automation.
- You'll see that the Speedy and Longer Data Updates started at the same time and ran simultaneously, yet the Validation workspace did not run until the PostProcessing_LDU workspace completed.
You've used the Split-Merge Block to orchestrate parallel processing and merge the workflow back into a single stream before continuing with downstream workspace actions. This automation accomplishes Frank's task for data updates while leveraging FME Flow's parallel processing and the Split-Merge Block.